Importing Data into SnapPlus |

|

|
|
Importing Data into SnapPlus |
|
|
Importing Data into SnapPlus |
|
|
|
Importing Data into SnapPlus |
|
|
|
|
||
When you download data from the SnapMaps website, SnapPlus stashes it in a "holding area", allowing you to control what gets permanently saved into your farm database. This holding area is represented by the tabs on the SnapMaps screen. For SnapPlus to make use of the downloaded data in your nutrient management plan, you must first import it.
Download your data from SnapMaps using the Download button. (It is good practice to take a snapshot after downloading.) The grid will update with the data from the map. Anything new (i.e. different from what's in already in your farm database) will have bold italic text. Anything that's eligible for import will also be highlighted in yellow/orange. All the downloaded data starts out bold italic and highlighted. (What does the "Exists" column mean?)
To import all of the differences, simply click on the Import Highlighted Cells button and all of the highlighted yellow/orange cells will be imported. The yellow/orange highlight will go away and the text reverts from bold/italic to roman. SnapPlus will prompt you to also visit the SnapMap Restrictions and SnapMap Acres tabs.
You may have some existing data which you don't wish to overwrite with the new stuff. SnapPlus offers several ways to protect the existing data:
1.To protect all of a field's data from being overwritten, click the Is Locked checkbox. (The Verified checkbox on the Fields screen can also be used.)
2.To turn Is Locked on or off for all fields, first click the ALL cell in the upper left and make sure all rows are highlighted blue (this may take 2 clicks). Hold down the Ctrl key and click on the words "Is Locked" in the column header. You can also do this for a subset of fields, see "Multi-Cell Editing" under SnapPlus User Interface.
3.To turn of an entire column (e.g. Field Acres), hold down the Ctrl key and click on the column header. All of the highlighting in the column should go away, but the values will still be in bold italics.
4.To turn a particular cell off or on, hold down the Ctrl key and click on the cell. When the cell is turned off so it won't be imported, its color will be the background color (no highlighting of any kind) but the values will still be in bold italics.
If you need finer control over what's eligible for import, contact us for details.
Once you are satisfied that the correct cells are eligible (yellow/orange), click the Import Highlighted Cells button to continue. As with "Easy Import", the bold/italic and color highlighting change to indicate what has been imported, and you're prompted to go to SnapMap Restrictions.
1.To turn highlighting on or off for an individual cell, just click it.
2.To select or deselect restrictions by name, find any cell on the grid with that restriction name. Hold down the Ctrl key and click on the cell. A pop-up menu will be displayed as shown below. If you choose "Dismiss All", the orange highlighting will be turned off but the text will remain as bold italic -- that is, new data, but no longer eligible for importing.

When the restrictions you want to import are highlighted, click on the Import Highlighted Cells button to update the restrictions in SnapPlus.
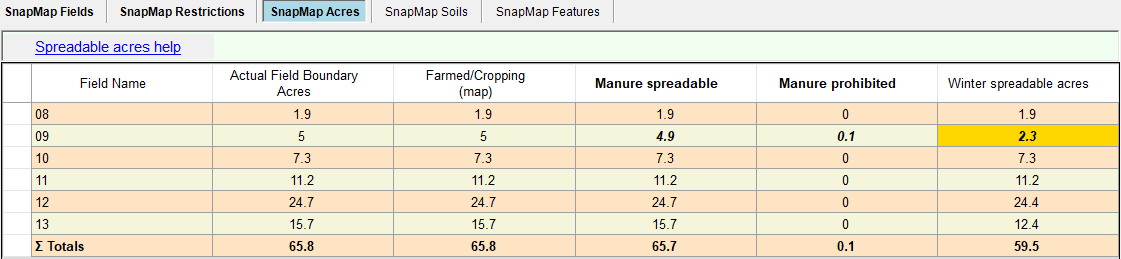
Finally, go the SnapMap Acres tab go make sure all of your spreadable acres are up to date. Bold italic and yellow/orange highlighting work the same as the other tabs. You can only turn highlighting on and off by row on this tab (click in the white cells at the left to highlight/unhighlight a row; hold down the Shift key and click to toggle a set of rows at a time). Click Import Highlighted Cells when you're ready.
When field data is imported, the spreadable acres are automatically imported. If you download after make changes like adding a well and don't reimport the SnapMaps Field screen, you should check the SnapMap Acres tab to make sure there are not highlighted differences that need to be imported.
The spreadable acres differences below are the result of adding a private drinking well to field 09. The Manure spreadable acres 4.9 and the Manure prohibited acres 0.1 are only one tenth different from what they were (5.0 and 0.0) so they are displayed in bold italic. The Winter spreadable acres has changed from 5.0 to 2.3 as result of the private drinking well 300ft winter restriction buffer.