SnapPlus User Interface |

|

|
|
SnapPlus User Interface |
|
|
SnapPlus User Interface |
|
|
|
SnapPlus User Interface |
|
|
|
|
||
In most cases there are tool tips (hover mouse over the button to see the tip) associated with the buttons. • • • • • Any button with an Open Folder image on the left will open a dialog box for the purpose stated with the button text. • Buttons with a disk image on the left allows you to save the grid data to an xls file. • • • |
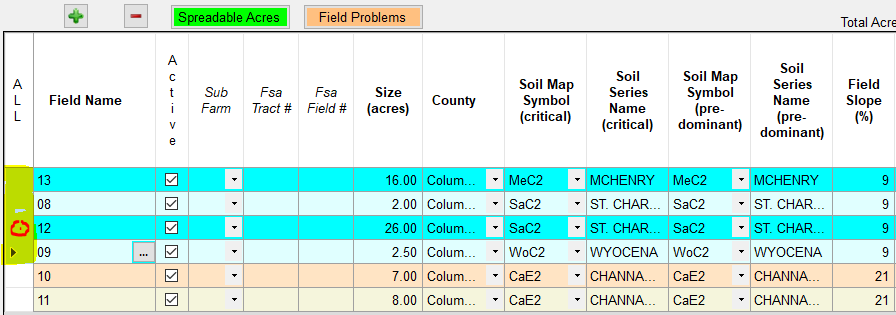
SnapPlus grids and tables have some unique features:
•Cells can be edited individually by clicking on the cell to edit. For some cells this will start editing the value of the cell directly (a flashing line will appear and the text itself will be highlighted), others will open a dialog box to select the value, finally others will have a drop-down menu to select the value for that cell from. Some cells are read-only, meaning you cannot directly set the value.
•The columns of some grids may be sorted by left-clicking with your mouse on the header columns. Most grid columns are also resizable.
•Multi-cell editing: Allows the user to change the value in all of the selected cells at one time.
▪General multi-cell editing grids: Grids that are multi-cell editing enabled have “ALL” in the upper left grid header cell. These grids are found on the Fields tab, Import Soil Tests, Import Daily Log and the Rotation Wizard. The Cropping grid has multi-cell editing limited to the crop yields.
▪Selecting rows for multi-cell editing grids: The data cells in some tables may be multi-edited, allowing the user to change the value in all of the selected cells at one time. To see an example go to http://snapplus.wisc.edu/news-help/how-to-videos and watch the Editing in the Daily Log Import video.
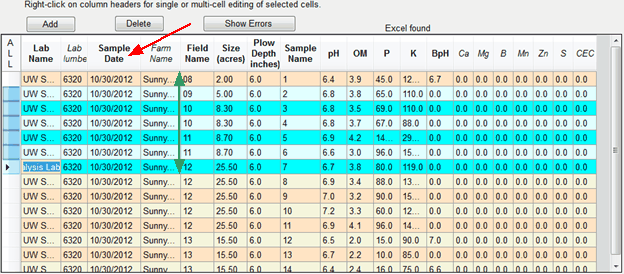
oSelected rows may be added or removed by holding the Ctrl key down when clicking on the row header.
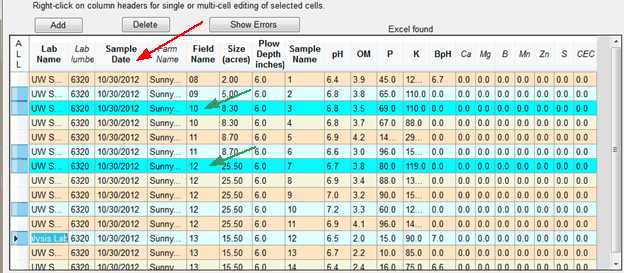
oAfter selecting the rows containing the cells to edit use multi-edit by right-clicking with the mouse on the column headers. A dialog box will be displayed where you will be able to select or enter the value for every of the selected rows.
▪Create a group from a grid: You can create a group straight from the Fields Screen or the Cropping Grid. Sort the grid or select individual rows by clicking on the row header cells (in yellow below). Select the rows that you want in your group. See the above topic, Selecting rows for multi-editing grids for different methods of selecting the rows you want. After selecting all of the rows that will be in your group, Right-mouse click on one of the selected rows' header cells. A dialog box will appear where you may enter a unique group name.