Using the Soil Tests Screen |

|

|
|
Using the Soil Tests Screen |
|
|
Using the Soil Tests Screen |
|
|
|
Using the Soil Tests Screen |
|
|
|
|
||
The soil test screen shown is divided into three parts: The Field navigation area, the Soil test history for the field, and Individual soil test samples for test date. You can view how-to videos for the Soil Tests Screen at http://snapplus.wisc.edu/news-help/how-to-videos/.
Field Name navigation area:

1. Field: Use the drop down menu to choose a specific field.
2. Field Navigation buttons: Use the navigation buttons to scroll through the fields.
3. Field Information area: This area displays the field information that was entered on the Field screen.
Soil test history for the field:
This table shows the adjusted field averages for a specific field. It also shows the soil testing history for this field if there is more than one date entered. All highlighted areas on this screen must be filled in for SnapPlus to calculate nutrient recommendations.

Note: If you import your soil test samples and the test dates are a few days apart you may end up with two or more soil test rows in the grid above. Those soil tests should really be considered one soil test for SnapPlus purposes. You may merge the samples into the older soil test date. To merge two soil test dates:
•Right mouse click on the row header of the older soil test date and you will be prompted to merge the samples from the row above. Click Yes to merge the samples.
![]() Use this button to manually add a soil test to the field history. When you click, a row will be added with the date set to today's date. To change the date, use the drop down menu. If you have multiple samples for the field, use the table below and Add Soil Sample button for each sample.
Use this button to manually add a soil test to the field history. When you click, a row will be added with the date set to today's date. To change the date, use the drop down menu. If you have multiple samples for the field, use the table below and Add Soil Sample button for each sample.
![]() To delete a specific test date, first select the date, then use this button to delete the entry.
To delete a specific test date, first select the date, then use this button to delete the entry.
![]() : Use this button to import soil test data from a soil lab file: an excel file (.xls, .xlsx) or a text file (.csv, .txt). SnapPlus can also import Latitude and Longitude if last two columns are in the import file. See the Importing from Soil Lab file for step-by-step instructions.
: Use this button to import soil test data from a soil lab file: an excel file (.xls, .xlsx) or a text file (.csv, .txt). SnapPlus can also import Latitude and Longitude if last two columns are in the import file. See the Importing from Soil Lab file for step-by-step instructions.
Individual soil test samples for test date table:
This table shows the individual soil sample test results for a given test date. The required fields for each sample are Test date, pH, Organic Matter (%), Phosphorus (ppm), Potassium (ppm). You can edit any of the cells by clicking on them. SnapPlus will use the adjusted field averages in the upper table for all calculations.
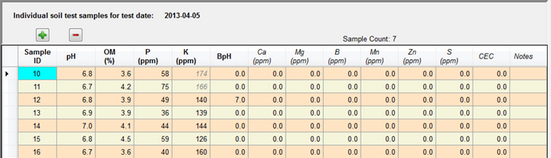
![]() Use this to add samples to a specific test date for the field. The required fields for each sample are Sample ID, pH, Organic Matter (%), Phosphorus (ppm), Potassium (ppm), and BpH. BpH is required for certain lime recommendations, enter 0 if unlivable. You can edit any of the cells by clicking on them.
Use this to add samples to a specific test date for the field. The required fields for each sample are Sample ID, pH, Organic Matter (%), Phosphorus (ppm), Potassium (ppm), and BpH. BpH is required for certain lime recommendations, enter 0 if unlivable. You can edit any of the cells by clicking on them.
![]() Use this to delete an entry once you have highlighted it.
Use this to delete an entry once you have highlighted it.