The Cropping Grid |

|

|
|
The Cropping Grid |
|
|
The Cropping Grid |
|
|
|
The Cropping Grid |
|
|
|
|
||
Another way to view the cropping data is by going to the Cropping Grid. To switch between the normal Cropping Screen and the Cropping Grid click on Cropping Grid Edit in the View menu or the short-cut ![]() . When the Cropping Grid is enabled a little check mark will appear next to this button in the menu.
. When the Cropping Grid is enabled a little check mark will appear next to this button in the menu.
The difference between the Cropping Grid and the normal Cropping screen is that the Cropping Grid displays information for multiple fields for one crop year in a grid with one row per field, while the normal Cropping screen displays all of the cropping information for a single field over multiple years.
Helpful Tips for the Cropping Grid View:
•Clicking on a column header will sort the column first in ascending order then in descending order.
•The acres for the selected field rows is displayed above the grid. You can sort the fields by crop, for example, and select all of the fields in a crop to see the acres in that crop.
•Clicking on the cells will open dialog boxes where appropriate (similar to the Cropping screen). Use these dialog boxes to change the values in the grid. More information about each of these inputs can be found in the other help documents in this section. The biggest difference in dialog boxes is that the Nutrient Application Planner for adding applications is opened by clicking on This year's manure or This year's fertilizer in the normal cropping screen, where in the Cropping Grid it is opened by clicking on Over/Under N-P2O5-K2O.
•Multi-cell editing is allowed for Crop, Tillage, Yield Goal, and Irrigated. This can be accomplished by selecting rows with the same crop then right mouse clicking on the Yield Goal column header cell. You can also create a group from the Cropping Grid. See Create a Group from a Grid for details.
•Clicking on the Prev. Tillage or Tillage header text will open help to the Tillage Explanations section.

The Import and Export yield buttons are only available for WPDES farms :
Export Yields will allow you to export your planned cropping data for the current crop year. A crop yield import compatible excel file will be saved to your Export folder or you may select where to save the file. You may want to make a group of the fields you have harvest data for and use the group before exporting your data. See Create a Group from a Grid for details. The export file should be used as a starting point and edited with actual harvest dates and harvest yields. After editing, this export file can be used for importing your actual yields.
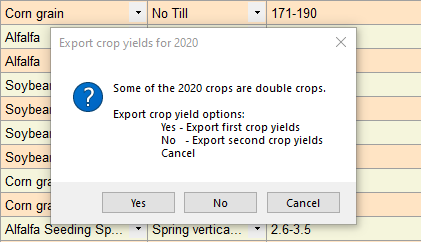
After clicking on Export Yields, if any of the fields have dual crops, you will be prompted to select which you are exporting - the first or second crop. You can not put both in one file.
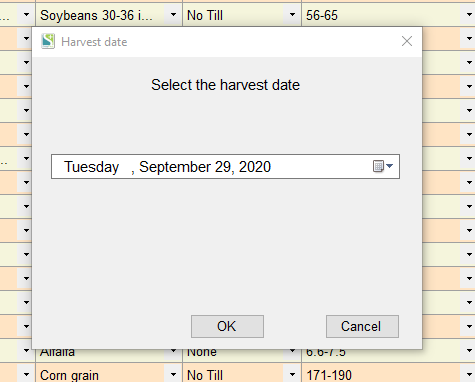
Next you will be prompted to enter a harvest date. Since the harvest date is required, entering a date here will give you a starting point. If you enter a date that represents most of the fields harvests dates, you should be able to minimize editing that date.
Finally, you will be prompted for the location and name of the file for saving. Make sure you save the file in a location where you can easily find it.
Import Yields will allow you to import your crop yields from an excel file for a specific crop year.
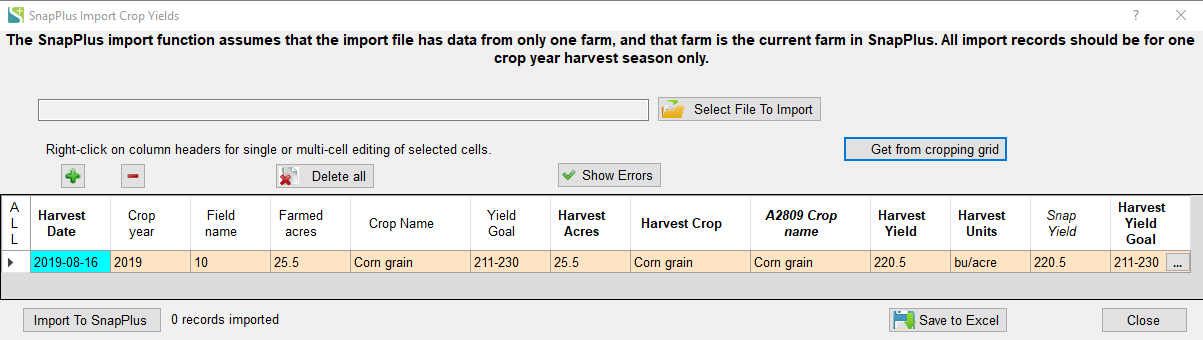
Select File to Import will open a dialog box so you can select your file with the actual yield data.
Get from cropping grid will fill the grid with the data from the current crop year.
The + , - and Delete all buttons are standard buttons used with a grid to manage the grid records (add and delete).
Show Errors is also a standard grid button that will refresh the highlighted differences in the grid.
Save to Excel will save the current grid data to a file in a location you may select.
Import To SnapPlus will import the grid data to your actual cropping data.
Import actual yields
Columns with bold header names are columns that represent the field harvest data for the year (or season for double crops). The other columns have values that represent field planned cropping data except for the Snap Yield column. The Snap Yield column is the field average yield - Harvest Yield divided by the Farmed acres.
Harvest Date click on the cell and select the actual date the crop was harvested using the standard date picker.
Harvest Acres click on the cell and enter the acres harvested.
Harvested Crop if the crop harvested is different than the planned crop, click on the cell and select the crop harvested.
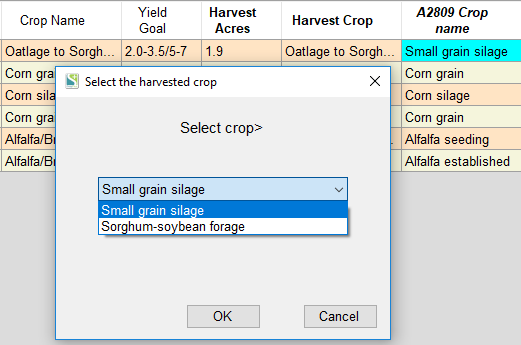
A2809 Crop name if the planned crop is a double crop, click on the cell and select which crop is being harvested.
Harvest Yield click on the cell and enter the actual yield, in the Harvest Units, for the area harvested.
Harvest Units is the SnapPlus recognized units of measure for the harvested crop.
Snap Yield is the average yield over the farmed acres.
Harvest Yield Goal is the SnapPlus accepted yield range for the calculated Snap Yield. Clicking on the ellipsis button in that cell will display the various yield ranges. If the calculated Snap Yield is out of range it will use the closest range available. For example, a yield of 300 bu/acre is out of range and the Harvest Yield Goal would be 251 - 270.
Double crops: If you have a double crop, Oatlage to Sorgh... , you may select which of the two crops the Harvest Yield represents.
Any warnings will have to be cleared up before importing the Yields

The yellow cells are all yield data for the same crop and field. The orange cells are yields that aren't recognized. Alfalfa ranges are 0-0 then jump to 2.6 to 3.5 so the yield of 1.5 is not valid.
The yields for the yellow cells should be combined into the latest harvest date. For example:
•Edit the row 4 harvest yield to be 6 (3+1.5+1.5). Field 1200 with the Harvest Date 2019-09-02
•Then delete rows 2 and 3. Field 1200 with the Harvest Dates 2019-06-01 and 2019-07-12.
•Click on Show Errors and the yellow cells will go away.
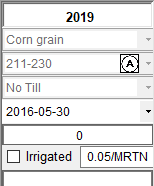
After all data is complete with no colored cells, click on the Import To SnapPlus button to update your cropping data. When you go to the Cropping Screen you'll see a Circle A icon in the yield goal selector and the crop, yield and tillage selectors are disabled for all years that have actual data. For dual crops, the Circle A icon will only be displayed after both harvest yields are entered.