Import an Exclusion Shapefile |

|

|
|
Import an Exclusion Shapefile |
|
|
Import an Exclusion Shapefile |
|
|
|
Import an Exclusion Shapefile |
|
|
|
|
||
To import exclusion areas features, simply zip up the shapefile with the exclusion areas. These four files need to be included: .shp, .shx, .dbf, and .prj, e.g. myexclusion.shp, myexclusion.shx, myexclusion.dbf, and myexclusion.prj. All four files must be present, and they need to be put into a ZIP archive to be uploaded. (If your GIS software produces more than these four files, that won’t hurt anything.) Now click Drawing Tools | Import an Exclusion Shapefile. Browse to your exclusion area zip file. Select it and click Open.The following box will appear:
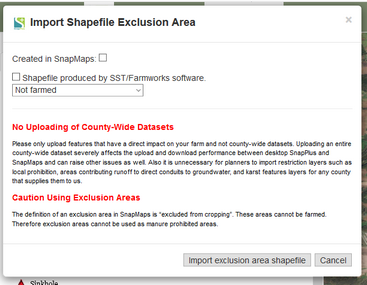
•If the shapefile had been previously created in SnapMaps, just click the Created in SnapMaps checkbox and click Import Shapefile.
•Select the type of exclusion area you would like to assign to each feature that is created.
•If your shapefile was produced from SST or FarmWorks software, click the corresponding checkbox. This will add the appropriate .prj file that was missing. This will not work with shapefiles that are missing .prj files from software other than SST or FarmWorks. Once you have finished selecting your options click, Import Shapefile. The website will take some time to import the shapefile based on the number of fields it contains. Once it’s done your fields will appear on the map.